10 Great New Business Strategy Software Features
Take a few minutes to read through some of the new software features to learn more about the enhancements we have made over the past few months. Please let us know how you find these new features and how we can improve StrategyBlocks even further.
New features
- Login integration – Single sign on with Google or Salesforce usernames
- Google Drive – link Google Apps files to a block or risk
- Milestones – new approach to progress updates
- Block distance – more control in the layout of map spray diagram
- New block type – greater layout options in the map
- Block Preview in Map – highlight the current block
- Custom Health Calculation per Block – create a different Health calculation for every Block
- New details screen – new intuitive details screen with enhanced functionality
- Broadcast messages – email groups of users at the same time
- Scrolling blocks – automatically cycle through all block types in the Blocks View
1. Login integration
We all have more than enough passwords to remember; why not login in to StrategyBlocks with a Google account or a Salesforce.com account! The added advantage of logging in with your Google account will allow you to utilize our new Google Drive integration (see number 2).
StrategyBlocks now supports Single Sign On (SSO), which means users are now able to log into StrategyBlocks using their existing Google or Salesforce credentials. This is achieved by delegating the authentication to the external login’s authentication workflow–a workflow the user is familiar with. Once a user is authenticated by the external service, the user will be forwarded back to StrategyBlocks along with the username of the account to log into. To establish what username to log into after authentication, the external login email address must be identical to the username of your StrategyBlocks login.
To sign into StrategyBlocks using SSO, select one of the supported external services in the login page.

2. Google Drive
We have recently redesigned our Files layout, and during the redesign we added support for Google Drive as a new file type that can be attached to a block/risk. This new integration allows you to attach a reference to a document in your Google Drive as a supporting document. This is similar to attaching a link (URL) or uploading a file, and contains aspects of both.
Creating
Before you can begin attaching references to files in your Google Drive, you must make sure Google Drive Access is enabled for your company and that you are logged into StrategyBlocks with your Google account. StrategyBlocks needs your authorization to retrieve the list of files in your Google Drive.
There are two methods to login using your Google account: the first is to select the Google login option when you login to StrategyBlocks. The second is to sign in from the Google Drive dialog if you are already logged into StrategyBlocks as shown below.

Once you authorize StrategyBlocks to retrieve files from your Google Drive, you can begin to search and select the document you wish to attach to your block/risk. When you create a supporting document you have the following options:
- Title: This is the title for the document.
- Description: A description for the document.
- Save a copy: With this option enabled it will allow StrategyBlocks to cache a copy of the document on the StrategyBlocks server. Any changes made to the document within Google Drive after the supporting document is created will not be reflected in the version cached in StrategyBlocks, until a copy of the document is manually re-saved.

Viewing
When you view this type of supporting document in StrategyBlocks, you are given the options to view/edit the document in Google Drive in a new browser tab, or to download a copy of the saved document (if a copy was saved). StrategyBlocks does not provide sharing options for the Google document referenced; that is, we expect the document owner to manage the sharing options in Google Drive. A user can only view/edit a document in Google Drive if the document owner has given the user appropriate permissions.
3. Block Milestones
Until recently, the only way to update progress was to report a percentage that seemed right. That is, the owner of the block has an impression about how far along they are, and reports it as a progress amount. This is suitable for many tasks, but sometimes a strategy involves a fixed checklist that needs to be completed and a simple percentage doesn’t explain which tasks have been finished. With the addition of milestones, a block owner can now report progress by ticking a list of check-boxes.
Define Milestones
Milestone definition lists need to be defined first by your administrator. To see which milestone definitions are available, click on the trophy icon in the administration pages:
![]()
One on side of the page there is a table showing all the definition lists. If you click one of the rows (or add a new one) a panel appears on the right with the details of this milestone definition.
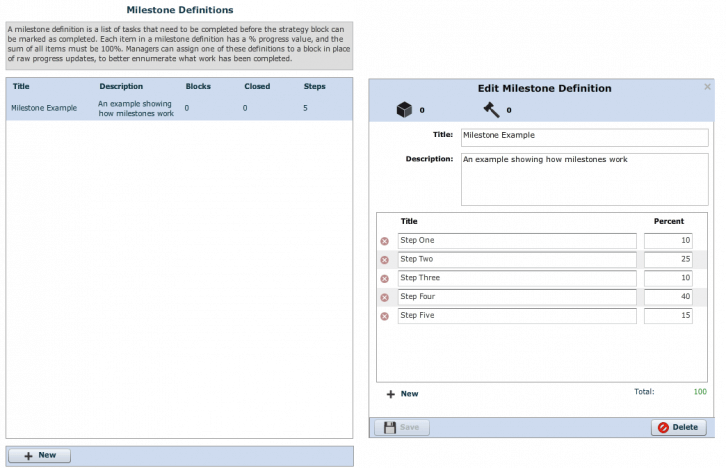
Each step contains a title and a percent value and the percent values must total 100.
Assign Milestones
If you’re the manager of a leaf block (a block at the very bottom of the tree), you can assign a milestone definition to it in the details popup. Note: As you cannot report progress on non-leaf blocks, you cannot assign a milestone to non-leaf blocks either.
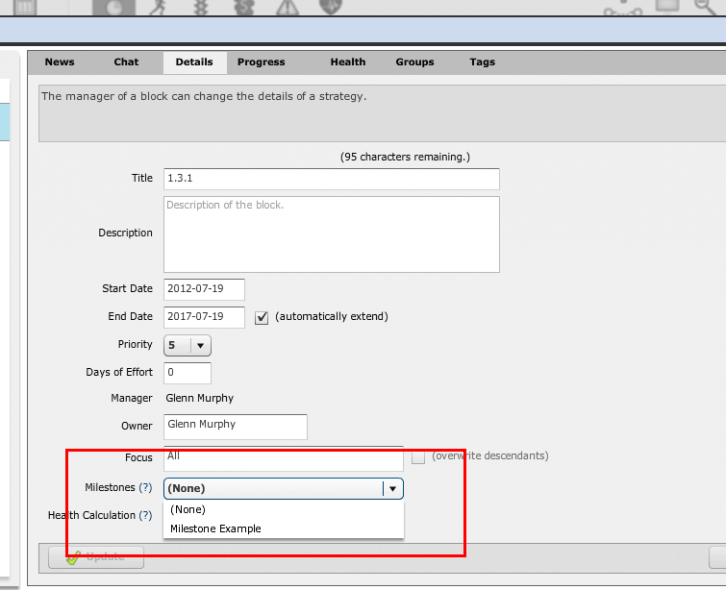
Once a block has been assigned a milestone definition, the progress tab changes to show a list of the milestone steps with check-boxes.
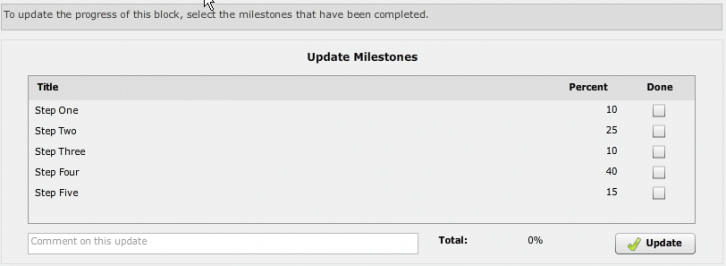
All the owner of the block needs to do now is select which steps have been completed, and submit.
Updating Milestones
The progress bar on a milestone block also looks a bit different than a normal block: the bar is subdivided proportionally into the milestone parts. However, there are two different ways this happens. When the bar is not being edited, the selected milestones are pushed to the left, and the unselected ones are pushed to the right (preserving the order within each set):

The reason for changing the order is so that the bar still represents the current % progress reported against the target line. Once the block is being edited, the milestones are shifted to their correct positions and become toggle buttons:

This makes it very easy to update your block’s progress and also provides a better form of a reporting for your managers to track what’s actually been done.
4. Block Distance
A recent feature for StrategyBlocks is the Block Distance. You can find the control on your toolbar next to the display settings.

Or inside the display settings popup:

This setting controls the degrees of separation from the currently selected block. This is best described by using the radial map as an example. In the image below, the selected block is the root (centre) node, and the distance to each leaf is 3 steps.

Now, if I change the block distance to 2, this is what you’ll see:

All the leaf nodes have been hidden because they exceed the current block distance. This setting behaves the same for all the block pages (tree, map, timeline, and table), but appears slightly differently in each one.
The objective of this feature is to improve both performance and usability. On the performance side of things, the fewer number of elements being drawn, the more responsive the product is. This particularly relevant to larger strategic models.
On the usability side of things, limiting the amount of data presented to the user is very important in communication. Too much information can be overwhelming or confusing. The distance feature allows users to view a narrow slice of the pie rather than the whole thing. For instance, in a large block tree (which is already a subset of the entire model), this is what the owner of a leaf block might be presented with:
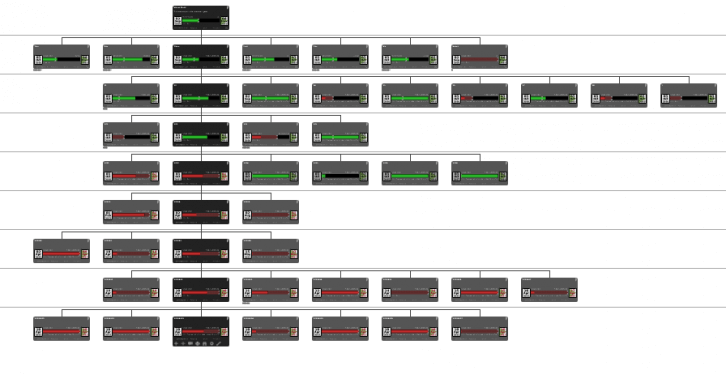
The path to vision is clear enough, but showing the siblings of all ancestors just adds to the visual spam. Block distance can help users focus on the current context. In the next screen, the distance has been set to 2:
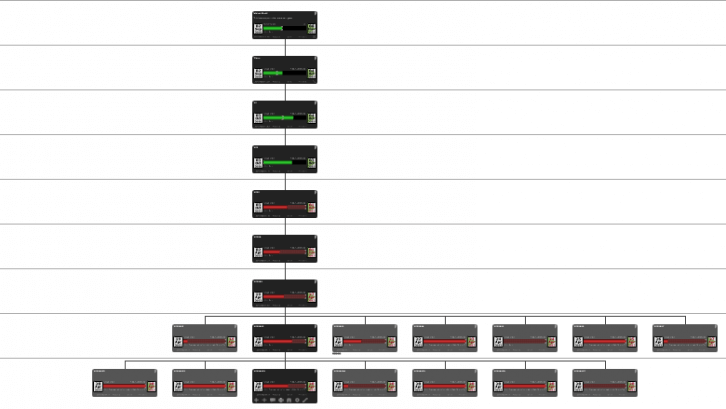
This is the same view, with the same selected block, and the same path-to-vision, but without the performance and usability penalty of all the ancestor siblings.
5. New block type
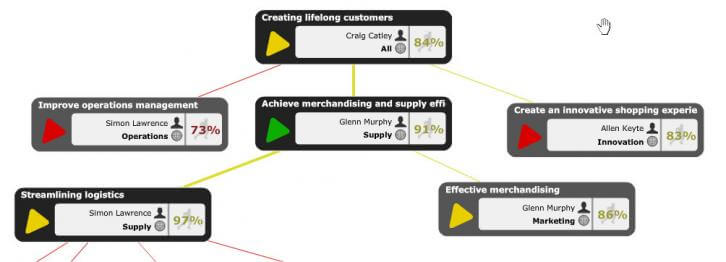
There is now a new block type available to you in the map view, we call it a summary block. It includes the Owners name, Focus Area, completed progress (%), and the Health indicator. Of course the Health indicator can be configured however you would like, either globally for the whole organization or more recently per block. You can therefore use the Health indicator however you wish, it can convey the status of one or more KPI’s, perhaps a risk and a KPI, or include progress. The Block has everything you need to create a complete balanced scorecard strategy map.
6. Block Preview in Map
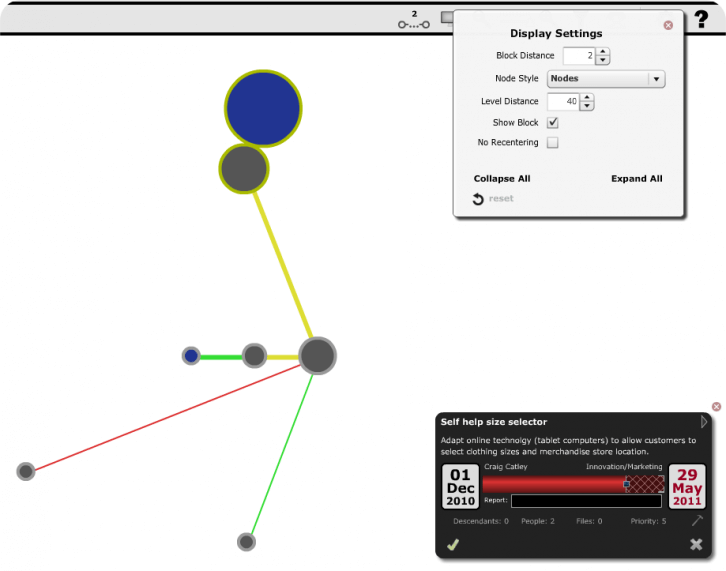
While exploring the map view, perhaps it would be useful to view and update the details of the currently selected block? Now in the bottom right hand corner, the full block is provided and this view will be updated every time a new node is selected. This saves selecting a block and going backwards and forwards to the block view to see the individual details of the block. Of course if you are crafting a screen to be included in a briefing book, the block can be turned of by clicking the close icon or from DISPLAY SETTINGS > SHOW BLOCK.
7. Custom Health Calculation per Block
In the past, the Administrator had the ability to create a global rule for how block health was calculated. However not all blocks are the same. Perhaps in some cases a KPI is more important than progress, or a significant business risk has been discovered and needs to dominate the health of a strategic activity.
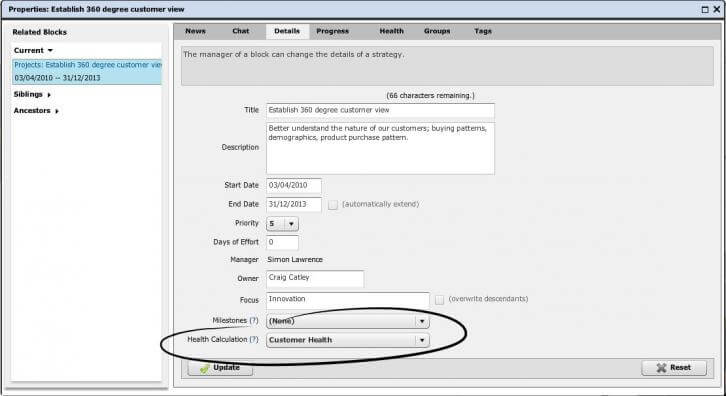
We have now taken the health calculation and opened it up to all Block Managers. By default each block will inherit the health properties set globally, but this can be overridden at the block level. The first step in the process is a new health definition, this is created by an Administrator. In the example provided, a definition called “Customer Health” has been created. There are no risks associated, so this has been removed. However all relevant KPI’s associated with this block activity are going to be weighted as having 3x times the importance of the amount of progress recorded against the block.
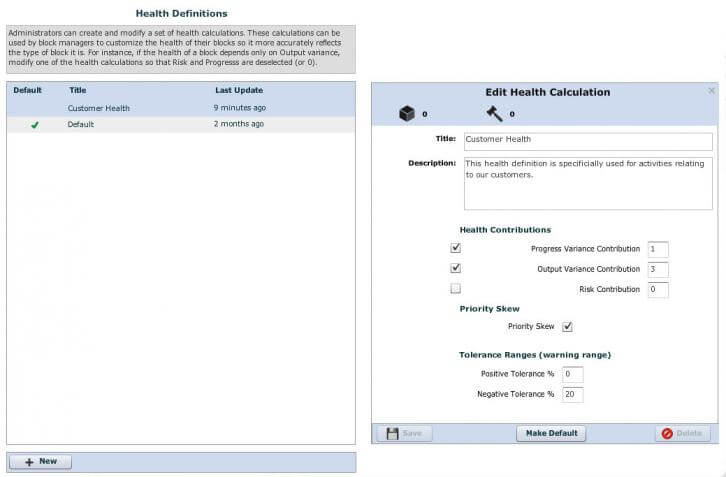
With this in place the Block Manager can use the BLOCK>DETAILS screen to select the desired health definition and override the default settings.
8. New details screen
We have redesigned the BLOCK>DETAILS screen to make it more user friendly. In addition it has some new functionality. Each feature has now been separated into its own space using the familiar tab system. Included in this screen is: News, Chat, Block Details, Progress / Milestones (NEW), Health history (NEW), Groups (security) and Tags.
9. Broadcast messages
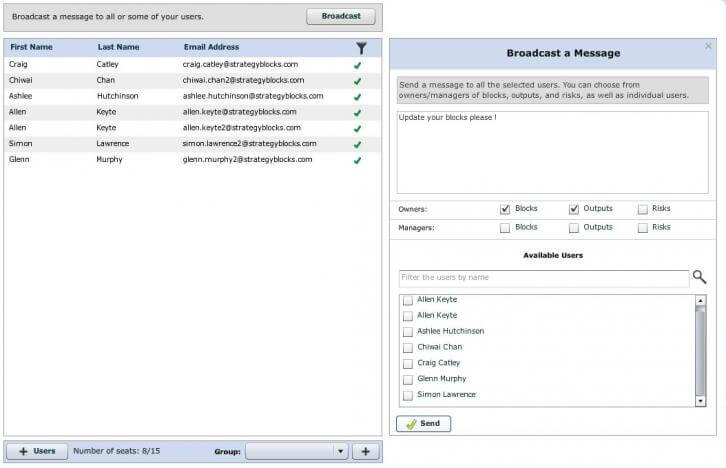
Sometimes it is useful to be able to give everyone a reminder that it is time to update their block progress. But who wants to create an email and add all your StrategyBlocks users. So now as an Administrator you can broadcast messages to all or some of your StrategyBlocks users.
By clicking on ADMIN>USERS>BROADCAST the Administrator can select specific users from a list of all active end users or a group of users based on their ownership. In the example below, the message will be sent out to only Block Owners and KPI Owners. Using this approach an Administrator can target specific individuals very quickly and get out a message in a fraction of the time.
10. Scrolling blocks
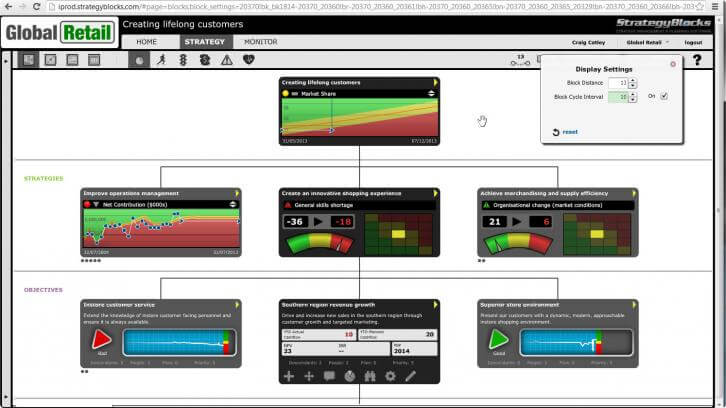
Consider all the different blocks you have, some with KPI’s, some with risks, some with financial data. Now you can see all of the different block types scrolling automatically. Within DISPLAY SETTINGS turn on BLOCK CYCLE INTERVAL and set the time in seconds. After each period the blocks will fade into their next state.


Leave A Comment